Showing posts with label Hobby. Show all posts

Monday, June 28, 2010

Expanding my ranks

Just a little update to keep the blog moving. I have the 1500pt League game this Friday at the local store. What I'm thinking right now for my army is to use the Honor Guard for my semi-beat-stick. Not as tough as say, Termies or Sang Guard, but still have access to good weapons and is a force multiplier. Their biggest asset, to me, is the Priest that can't be singled out. In the last few games, my IC priests have been getting sniped in CC at every attempt. I won't drop the one I have in my list, but I just need more redundancy and will include two units of HG in my 1500pt list. This also gives me a more interesting modeling prospect. Right now I'm using my Death Company box set to be my veteran Sgts and sprinkling BA icons into other units as well as Dark Angel icons. If I could have a custom icon for my chapter, it would be simply the BA angelic wings with the DA sword, instead of the blood drop BA use or the sharp DA wings.
Anyway, I see Honor Guard being draped in robes, being a bit more mysterious and demanding of respect, as they are captains-in-training. In comes the DA Veterans box set. I like their robes and hooded heads, plus their add ons are pretty cool like their differently shaped daggers and swords. I also purchased a DA Company Master model to represent a Blood Champion if needed. With his tall winged helm and robes draped over his shoulder, he's an impressive sight. As for the Sang Priest model, I took anything from the DC set that has a grail on it (including the helm, pistol, and JP/Power Pack) so that he would easily be seen as the Priest amongst his brethren. Since he technically can't be upgraded with weapons, I glued him in place and is pretty much ready to be painted. The others will be fully magnetized to accomodate either meltaguns if I want to make a shooty drop unit of doom or maybe Storm Shields and power weapons for an assault beat-stick. I also used my Priest as a test bed for my massive initiative of magnetizing all my assault marines to accept either power pack or JP. The hole on the JP and PP are slightly less than 1/8th inch, and putting the drill bit to them only shaved out a bit of plastic, but that's all that was necessary to fit in a 1/8th inch disc magnet in snuggly, with a dab of glue to keep it more in place. I lopped off the nub on the model's back and drilled into the back with the bit til the magnet was flush with the back. Worked like a charm, but I only had 2 1/8th magnets, haha! So once I confirmed this worked, I ordered a ton more magnets and hope they arrive soon. I will also be using these for the arms, as I was using 3/16th sized discs (in my previous blog posts) and they have proven to work, but be a pain to get right. I'll post pics and updates after I get these magnets in the mail.

Thankfully, the DA box set was only like 21 dollars and the Master was 11 at the local store, since DA aren't that popular (the DC box is 33, and stuff like the Sanguinor was 19) and for being in the league I get double the customer points. Ya know, for like every so many points you get a dollar off your next purchase sort of thing. Since I didn't have to pay shipping and I got it in my hands right then and there, plus more points, I couldn't resist.

Friday, May 14, 2010

Magnetizing Assault Marines

As I mentioned before I finally got some new magnets to customize my marines. I plan that each squad's Sgt and Special Weapon guy (and Heavy Weapon in the tac squads) will be magnetized to switch up options. More cost effective than building multiple marines, given the current economy and rumored GW price hikes. For this I'm using the 3/16" x 1/32" disc magnets, which fit perfectly in the shoulder area of a marine. Anything smaller and I don't think there would be enough pull to hold up all the weapon types and anything bigger or thicker just won't work on such a small model. Drilling seemed to be out for such a large hole on a little model as well. The problem with simple drilling is it leaves a dimple, not a hole, so it's not always the correct shape, or you'd need a specialized bit that would leave the cut flat, but that's just more money out.

Instead I simply just cut down the shoulder area on the torso, then I cut away a lot of plastic off the arm itself. This can negate the size of at least one of the magnets if you cut deep enough, and no one will be the wiser because of the shoulder pad. I don't cut away any of the rounded shoulder as this is what the armor pad has to attach to, I just take the part that makes contact with the torso down. Now, with this method, you won't really be able to get both hands on a rifle like the Melta-gun, or a Bolter for the Tac squads. For ASM, they ditch the pistol for the new weapon and always retain their Chainsword for CC. So, I just modeled my guys to dual-wield the rifle in one hand, and the sword in the other. My guys just can't wait to get into CC they already have their swords drawn, plus, this would account for my abilities to roll 2- a lot, haha. Since half of the special pistol options are left handed, but none of the rifle arms are, I just took a generic left-handed pistol arm and cut off the pistol, filed it down, and popped the flamer on it in this case. I'll do the same for another Melta when I buy more special weapons. Here are some images (click for larger detail) of what it looks like at this point.

As you can see in some of the pics, it's not that noticeable when painted over and the magnets fit perfectly into the should pad areas. The first pic shows off some of the new Death Company sprue weapons that my Sgts will be using. This is a seriously easy process, just repetitive for so many options, but will save a ton of money, makes WYSIWYG quick, and gives your guys a bit of style with the moving parts. Plus it's fun to give him dual-pistols and dream. :-)

Monday, May 10, 2010

Painting My Rhinos

Woo! I got my paint brushes (and magnets) in the mail on Saturday from miniwargaming.com. I bought their Taklon brush set which has varying sizes from detail to large tank. I got a free tank brush months ago from one of their sales and been using it for my Rhinos and it's been awesome. I'm no artist, but I know I'm not a fan of the horse hair brushes so far, and these taklon bristles have been a lot more smooth and clean, so I bought a bunch more. I painted 3 of my Rhinos with the old mechrite base scheme already before I got my Ruddy Brown, but I based my new Baal Pred with the new spray paint to give the updated scheme a try. The process is now: Ruddy Brown Primer, Devlan Mud wash, Red Gore, and highlighting is actually on hold. I'm not a fan of the Blood Red paint; sorry, it's not a red, it's an orange and I need to mix it darker or find something else for my highlights. I added a ton of icons to my Rhinos for some character, but this has set me back as I really need to learn how to paint wings. So all my winged icons are on hold for a bit, but I also had a bunch of purity seals added. Since my armor is red, I decided to go for a green seal to contrast the armor. I basically did Knarloc Green foundation with a Thraka Green wash for the seal and Dheneb Stone foundation and Bleached Bone for the parchment.


All I gotta say is I'm really happy with the way they turned out. Even with the different basing the color ended up looking all the same. The pic has one painted the old way and the one with the Baal front armor was done with RB primer. The only difference was the texture of the RB primer vs mechrite. It felt rough and it absorbed the wash and Red Gore, in a good way. There was no pooling or streaking; it just held the paint where I put it. You'll notice the Angel Icon on the Baal pred is lighter; that's what the primer looks like vs the end result with the Red Gore. I just need to finish the icons with wings, add some boltgun metal to the tracks and smoke stacks, paint the head lamps and the Rhinos will be done. I have a pile of vehicle accessories like more doors, hatches, gun mounts, etc based and washed, but I needed sleep before I could finish painting them. I also started 3 more tac marines with the new scheme. I based 'em red, then painted anything black I wanted next (like joints and tubes), then washed 'em down. I'll do the Red Gore today and finish them up and post pics.

All in all, totally psyched to have new brushes to get the job done right. Oh, one thing I did start doing was a tip from Jawaballs. For the detail work, I started doing the thing where you put the detail brush in your mouth to lick the brush and twist it to a point. I thought it would be weird and taste bad, but it's really a great way to get the bristles moist without overdoing it by dipping in water, plus it keeps the point. For detail work it's great, anything more and yeah, you're just eating paint, lol.

Let me know what ya think so far! I'll update as soon as I can.

Friday, May 7, 2010

New Base Coat Painting

I've been starting up my painting blitz these past couple weeks to finally finish some models and get that satisfaction of having a painted army on the board. My Necron have been painted for a long time now, they just don't have any arms/guns because that assembly is made up of about 8 pieces per model (and I have 48 Warriors...) and that is just too daunting of a task when I don't like playing as them on the board. As for my Angels, I have about 15 assault troops, 10 tacticals, and 5 Rhinos, and a Land Speeder ready to go, including each of the PDF HQ-choice models.

My original painting scheme was basing them in Primer Gray and then layering Mechrite Red, Devlan Mud wash, Red Gore, and highlighting with Blood Red. The first thing I found a problem is was the gray base. It works fine for soaking up the paint and giving it a smooth feel, but any place I couldn't paint (like arm pits, necks, etc) stood out against the dark red of the armor. Minor details, but distracting for me, so I decided I'd go get a black primer spray and redo my guys. I couldn't find a black primer in all my searching, but then I stumbled across something... Krylon Ruddy Brown Primer. Ruddy Brown for a red army, you ask? Only it comes out to be a perfect stand in for a dry Mechrite Red, with all the benefits of a primer and a spray and it was only $2.97 a can. Now, I looked around online for pictures of this in use and found a 40k article on the subject. They said it would be 5-6 bucks and not any better than the store brand 99 cent can of spray. I disagree because 1) it was only 3 bucks and 2) directional nozzle for sweeping passes instead of directed blast of paint and 3) it's actually a primer and not just a base paint. It leaves the model a little rough to the touch, so paint will stick and get soaked up instead of just pushed around and pool up. This addresses the inaccessible areas as well, while not a dark black shadow, it is at least in the same ballpark red and not contrasted gray. Also it's not a heavy black that will need many coats of white/light paint to do chest eagles or eyes. And for the lazy man in all of us, even after basing them in Ruddy Brown, if you can't get to painting all you stuff, it still LOOKS NICE on the board. It's not a wall of gray or black (which I guess would be okay for Wolf and Templar players, lol) but actually looks passable. Below are some pics to show what I mean. 

(Click for bigger pics)

Everything in those are just a few minutes of time with the Ruddy Brown except the Rhino top that holds the turret, because I painted it before I found the spray paint, but it's still not a final product. For those that haven't seen the new BA models, that is the new Baal Pred turret with one of the new included icons attached to the Rhino door. The front has the icon shown in most official pictures of it. The doors and the turret are fully magnetized, as I blogged about earlier. Also, the two guys next to it are the new Death Company models that I will be using as veteran Sgts. Anyway, some professional painters might cry fowl and say I'm doing it wrong, but I like the results so far. Still waiting on my new brushes, so work will be on hold for awhile, but for whatever reason, I'm way more happy to play with these guys than my Gray Angels that have been in my battle reports before.

Friday, April 23, 2010

Tac Marine / ASM Painting Update

I decided to get another model off the painting line, this time an Assault Marine. He doesn't have either pack in the picture because I will magnetize all of them to be either Jump or Mech troops, so that is for later. I also took a new pic of my first Tac Marine. The painting process was mostly the same, only this time I painted the soft armor parts Chaos Black before my base coat. Last time I just painted the whole thing red and used Badab Black wash in those areas. I like the more solid black of straight paint instead of the wash, so I'll do it that way from now on. I added a Dark Angels icon to the ASM's boot that I painted with Shining Gold on the blade and Dheneb Stone on the wing and the helm is all black. I'll tell you, the models look fine in your hand, but looking at these pictures, there's just so much detail up close, I can see a lot of places I messed up. I'll have to go back and touch these up, but basically, this is what most of my army would look like. You'll also see my Tac Marine has more highlights and the pack looks like the right color this time compared to the first post. But yeah, my highlights are crazy wide and I'm using a Reaper 10/0 detail brush. Apparently I need to do this with a pin needle or something to get such smaller lines.

Tuesday, April 20, 2010

Tac Marine Painting Test

Well, last night I did. I sat down, stared at one of my tac marines and started painting. I chose one with a simple chest icon and a rank and file guy so I could glue the bolter and back pack on and be done with it. Not gunna get in too much of a hoop-la over this 'cause I need to go back and add another layer of red to the power pack, and it would need icons on his shoulders and basing, but it took me weeks to actually do just this much. If I had a table full of guys at this point, I would not be disappointed. I didn't mean to steal it, but the scheme comes out to be pretty much the Angels Encarmine layout. I love darker, muted reds than the bright Blood Red of the typical BA. I also love the look of the Flesh Tearers, and that might be how my assault marines turn out, with black helms and shoulders. Anyhoo:
For the color scheme it's as follows:
  • Base with Primer Gray spray paint
  • Mechrite Red Foundation
  • Devlan Mud Wash
  • Gore Red
  • Blood Red highlight
Eyes:
  • Knarloc Green Foundation
  • Goblin Green
Purity Seal:
  • Mechrite Red Foundation
  • Gore Red
  • Leviathan Purple Was
  • Dheneb Stone Foundation
  • Gryphonne Sepia Wash 
Boltgun/Icon:
  • Boltgun Metal
  • Devlan Mud Wash
Nothing fancy, just a couple layers. I wanted quick and easy. I have no real painting skill and have shaky hands, so I don't like to dwell in one area for long or it just smears. As such, the highlighting with Blood Red was nigh impossible. I need to practice that more and take more time. I can whip up a few more of these and some assaulters, but a full force won't be ready until I magnetize my Sgts and Special Weapons models. I'll post again when I clean this guy up or have another test model done.

Saturday, April 17, 2010

Area Terrain and Embarrassment

I was sitting around procrastinating from painting my Blood Angels and noticed a pile of styrofoam I've been saving for some terrain. I decided to make up some area terrain for my board since it's a simple enough project and hard to mess up. I created two pillars, one having some damage from some ancient battle and some stone walls to provide cover and a boundary for the terrain. The base is a heavy cardboard so it wouldn't flex when moving around or rip apart. I threw on a couple extra Dark Angels icons because I bought a whole slew of em when I first started my marines last year. I based it with black spray paint, then a layer of rough-texture spray that gave it rocky feel. I then painted it with watered down Codex Gray. The icons where painted with Dheneb Stone foundation and then covered with Gryphonne Sepia wash. I hit the edges of all the bricks and pillars with the wash as well to make an aged look from a lot of dirty rain fall. I edged around the stone with PVA glue and flock to give it a bit more character.


(Click for bigger pics)

On another note, I played another Kill Team vs my friend Jason who is still new to 40k. He fielded 7 Necron Immortals and I fielded a squad of normal marines with a Priest and a Razorback with a LC-TL PG. This isn't optimal in the least, but they are part of my 1500pt list and I have never fielded a RZB before. Boy was this one sided. He is blessed by the dark gods of the dice. He consecutively rolled 6s to glance me and 5s on the dmg charge to take off my PGs first, then my LC, then finally immobilize me. My RZB literally did nothing.  He could have had an armor rating of 5+ and still won the game. He was rolling 5 and 6 about 75% of the time, and i was rolling mostly 3s.... And charging T5 units without power weapons is terribly hard. Average to hit, below average to wound, and then they have an average shot to get back up, and of course he was hitting those numbers, but I wasn't. It came down to me only have 3 guys left and he had 5, all of us in assault, and I was rolling low and him high, so we just called it. I knew Immortals could be bad ass, but this was crazy lopsided. I could have taken my normal Kill Team load out of DC with all power weapons, or maybe a Furioso for easy wounds, but that wasn't the point of the game. Right now I'm just worried about the performance of normal marines and RZBs... We'll keep playing and eventually get up to 1500pt games where the real testing can begin.

Wednesday, April 14, 2010

Magnetizing My Baal Predator

Well, I've been working on my new Baal Predator since I got it on Friday and ready to post a couple pics. I decided to magnetize a few things like the turret and the Hunter-Killer Missile. Of course the sponsons are magnetized for either Rhino doors or the weapons, but this time I decided against trying to mag the HB and HF options. Partly because they have been redesigned and tougher to do now, but also, I never feel like I'll run HF, just personal preference. There's always count-as... Anyway, besides the weapons on the turret itself, there is a back portion, called the bustle, for either the Flamestorm or the Assault Cannons. I pretty much took the cheap and easy approach to this by using magnets and glue. This isn't the strongest combo, as the glue can fail on you if the pull is too strong. Something like green-stuff might be better after it cures, but I'm no good with that stuff so far. Here is what my pieces look like:


As you can see, the magnet in the center of each bustle will match up with the one in the back of the turret. The one to right of the back magnet is for the Hunter-Killer Missile. You can take it on and off as you use it and still leave the paint job on the outside pristine. I also felt bored enough to add a magnet for the smoke launcher, so if I pop smoke I can remove it. For the turret weapon, the part that pivots will stay in the housing, and the gun choice can be slipped in and the cowling slipped over the top for a snug fit and add matching bustle. Easy as pie, haha. Now I can seal all these parts up and move on to the next stage. As for my DC looking Sgts, they are all built up to the last part which is magnetizing their arms for weapon choices, but otherwise look great.

Monday, April 12, 2010

New BA Sprues and a Weekend of Kill Team

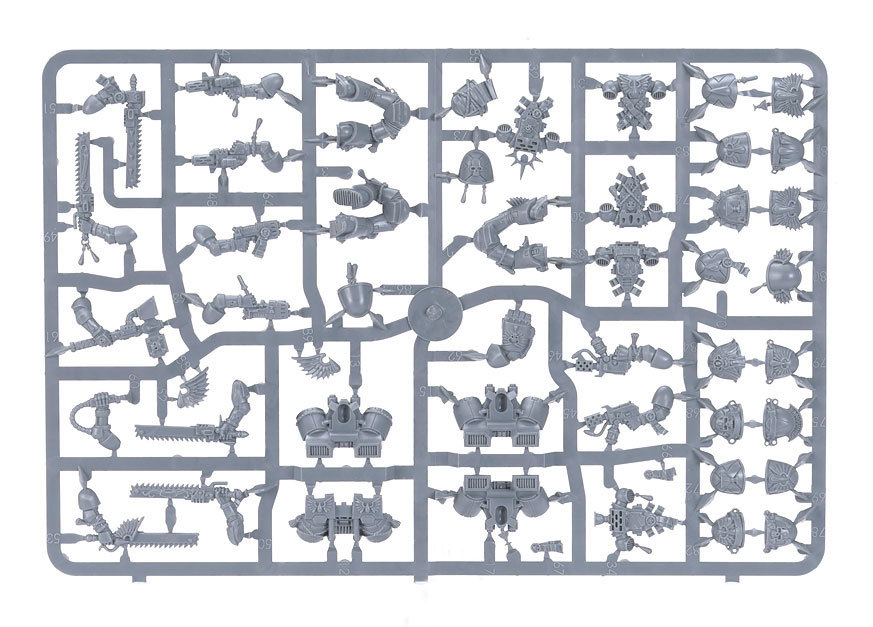
 Well I got my legit codex, box of Death Company and new Baal Pred in the mail on Friday! Gotta say, the quality of the new parts are excellent! So much bloodly blood drops and skulls and chalices and more blood references everywhere on these guys. Each DC will be magnetized as each one will be a Sgt for my assault squads and can take normal CC weapons, power weapons, the new Infernus pistols, or even the mighty Thunder Hammer. The kit comes with all those options, and even both Jump Packs and Power Packs, so I can take them in either a JP or Mech list in one simple switch. Since they will never carry their bolters I can sprinkle their ornate bolters into my normal Tac squads so it isn't such an obvious difference between ASM and Tac units in terms of bling. The should pads that come with are also amazingly detailed and over the top in variety. As for the new Baal Pred it includes the two normal sprues that all Rhinos use, and one additional sprue that has a billion pieces on it it seems. Two cannon choices, two sponson choices, and BA icons, all detailed and seems redesigned a bit. The sponsons look a bit more beefy than normal Pred choices and the TL-AC is plastic finally. The directions for both are also a bit more pro, which seems necessary for the level of detail and options they are giving us.

The weekend was also full with some Kill Team missions amongst a number of my friends and armies. The first was my BA vs some Tau fielded by a friend who hasn't played since 3rd Edition. I brought my Death Company as usual and he took a number of Warriors and a single Crisis Suit with plasmas and a Marker Light Drone. One of my guys was equipped with a power fist and fleet, who was singling out his suit. I was able to fleet and get that suit, which saved me a big headache, but it still wasn't a cake walk. Since everyone has to slog it to assault the Warriors and his drone consistently got a marker light on one of my guys, increasing a shot to BS 4 each turn. He got me to half strength before I got him and I failed my first leadership test (8) but we continued playing, at which point I was able to wipe him from the table, but he still got the official victory.

I also got a friend that has never played before to play against a different 3rd Edition friend to play another Kill Team game of my Necron Warriors vs Space Marine scouts and a Dread w/ MM. The scouts stayed in cover and took pot shots all game while the Dread advanced. The new guy, Jason, pulled off the incredible rolling a single to-hit, a six to glance, and then a 6 to immobilize the Dread in the middle of the board. With it relegated to a stationary turret, the main threat of assault was gone and he preceded to shoot out the scouts for a victory! Finally, on Sunday those two guys teamed up on me for a 2 on 1, 400pt Kill Team battle royale, where I also got double the Force Organization to be fair.

The SM player took normal Termies at an even 200pts and the other repeated his 10 Warriors. I took a Furioso with Frag Cannon (mostly to test this baby out) with fleet, a 5-man Sternguard all with a combi-melta and one being relentless, and 4 Death Company with 3 power weapons, one being preferred enemy. They won roll off and gave me first turn, so I deploy closest to the edge of the deployment zone, ready to open fire and assault. And again, Jason pulls it off with a '1' roll, which steals initiative in Kill Team. This leads the Termies to assault me first instead of the other way around. I lose FC and one attack in this case, but I still strike first in combat, so not all was lost. He charged a Sternguard and two assaulted a DC in range, the others did not make range or specifically avoided my preferred enemy DC. He cut down the Stern, but I took out one of the Termies with the other DC before he was punched to death. My PE DC fell back for a turn or so but then got assaulted by two termies. I split my attacks between them, and was able to cut down both! He then assaulted the Termie Sgt that carried a power sword and FC to gain the upper hand. Since I still got to go first with an extra attack and strength, I cut him down as well, making that DC my MVP. My Furioso Frag Cannon also proved to be valuable, taking down 3 Necron in one blast and then another 2 a turn later. No AP and I never rended, but putting two wounds per model is a sweet deal. The only other thing of note was using the Vengeance rounds on my Sternguard that resulted in blowing away a Necron and then failing a save for Gets Hot and killing myself. Oh well, the price of AP 3 weaponry. And I actually whiffed in assault against a single Necron with a DC, letting him attack back with 1 shot, and Jason actually hitting and wounding me! I failed my armor, but then was saved by FNP; a very close call to embarrassment on my part.

I've interested these guys to play a bit more often, especially Kill Team for it's small scale and ease of use. After they get used to 5th Edition more, I'll try some other Battle Missions and then get them up to 1500pt battles again. Overall a good time was had by all.

Thursday, April 8, 2010

Blood Angels Hobby Update

Just a short little update here. Since the return of the BA via this new codex, I picked up modeling my figures again. Way back when, I bought up tons of bits from E-bay on the cheap to make assault troops and a bunch of Rhinos. The Rhinos have been done for a while (built, not painted) but the Marine models sat untouched til now. I went ahead and built 3x 4-man units of assault marines with various configurations. The plan is 3 of the 4 currently built are normal assaulters with a permanent bolt pistol and chainsword. The 4th will be magnetized to accept a bolt pistol/chainsword combo or a special weapon type like a Melta or a chainsword/Infernus pistol.

The 5th man for each squad is the Sgt of course, but I have a special plan for them. I will be using the newest Death Company models for these guys; weird, I know. This pack is pretty much the best of all worlds. It comes with tons of BA iconography, chainsword/pistol combo, Bolter, powerpack, and jump pack for each man, including power weapons and Infernus pistols and even the thunder hammer. Also has 20 should pads and 8 heads, so you'll have plenty left over to sprinkle around to other squaddies. And since these guys will never carry their bolters, I can spread those out to a tactical squad, making the whole army look similar in theme, instead of plain marines over here and super bling marines over there. If I run 10-man squads, then obviously I'll only have one tricked out Sgt, so I don't get confused on who actually has the better stat line, but with this build plan if I run nothing by 5-man sqauds in RZBs, for example, I won't be short on Sgt models. I'll be justifying this all via the chapter's fluff (as I have never wanted these to be true Blood Angels, but my own successor chapter), not that I really need to justify it, but if some smart-butt asks why I have Death Company leading my squads, I already have an answer. And they won't be painted black like the DC, they'll be the same red as everyone else when I'm done. More on that in a fluff post.

To help this along I went ahead and ordered the codex (to make up for getting a PDF version early and I want to be legit), a box of Death Company, and a new Baal Predator. Since the Baal was seriously redesigned I thought it best to just buy the new kit. Plus it includes even more BA icons! The original plan was to buy standard Preds and make do via conversions, since the old metal upgrade kit seemed lackluster. I do have a single vanilla Pred on my desk, but it works out that Baals are FA and normals are still HS, so I can use both models! These will probably arrive at the start of next week and I'll get to building on those and take some pictures of the new models. Everything is getting their extra little icons and purity seals now, so I can't make excuses to slow me down. Once the glue dries I've been priming everything gray so all I have to do is settle on a painting scheme... which is the next hurdle. Looking to this as a helpful guide: From the Warp - How to Paint Blood Angels Red

Friday, October 30, 2009

Magnetizing My Rhinos

So another one of the hurdles that was keeping me from finishing my army has been wanting to magnetize as much of my models first, before assembling and painting them. Awhile back I ordered a couple different sizes of magnets from Miniwargaming.com so I could finally stop making excuses. After finishing a good number of my 40k tokens that I posted about earlier, I decided to switch gears and get some models done. I hemmed and hawed about how I was going to do this, but when I sat down with the models and magnets in hand, this was probably one of the simplest mods I've done or probably will do, since magnetizing the troops will be a smaller, more delicate job than the huge rhinos.

So as I said this was simple. I used the 1/4" x 1/16" Disc Magnets to ensure they could hold the weight of the finished HB or HF sponson of my Baal Pred. I measured out the distances needed inside the hatch here to make sure the magnets had actual contact in both situations of a door or a sponson. With the one magnet on the hatch itself and the other on the sponson, they had full contact and were spaced perfectly! Now for the door, I needed a spacer to make up the distance to the magent in the recessed area. I snipped a piece of sprue, filed it down to the width of the door and tested it: perfect again! With the sprue spacer and the size of the magnets they had full contact and perfect spacing. I started by using the rounded GW file to remove the rivet from the center of the inner rhino hatch to provide a smooth surface for the magnet to adhere to. Applied a dab of super glue and let it set.
Next I decided to magnetize my sponson options, eventho I feel I'll never A) use HF on my Baal Pred and B) never field a normal Pred that has las-cannons as an option, I still felt like I want the option or maybe something would change come next BA codex. This was a bit more tricky trying to decide how I wanted to mount it. I contemplated using Oni's method but I wanted to retain the up and down tilt of the guns for some reason, don't ask me why. So what I did was just cut above where he did to leave a bit of the arm that sits between the two gun halves. For this I used the 3/16" x 1/16" Disc Magnets. In general, go with Oni's method. I would too, but if I switch now, they won't all match up and I'm OCD when it comes to stuff like that, lol.

 (Click for closeup)

As for the other parts of the Rhino like switching out for a Whirlwind, Rhino doors up top, Pred turret, and the little hatches I decided that them being on top, I'd just let gravity do the work of holding them on. Trying anything else would be too complicated for all the options. Next up will be my Land Speeder, with magnetized options for the missile launchers, MM or HB and the HF or AC underneath. Should be a bit more of a challenge. Then will be my Heavy Weapon, Special Weapon, and Sarge in my tac sqaud.

As a general update, I've also started priming everything that I finish in Krylon Primer Gray. This eliminates me from trying to decide between priming in either white or black depending on the model as I have the full foundation paints and I wholly endorse them as a base paint, so the primer color is almost a moot point. Plus the can is labeled "primer" so it's gotta be right for the job, no? And it's only 3 bucks at Wal-mart and it has the angled nozzle so you can do passes in wide lines instead of a centralized circle.

Wednesday, October 14, 2009

My Necron Army (a WiP)


I did state and intend this blog to cover my first army, the Necrons, not just my Blood Angels successors. I didn't find it necessary to start a second blog just for them as the blog is mostly just my "workspace" on the internet, just like my work table at home. So, some background, first. I got into 40k via Dawn of War back in the day and was in love with the lore, read everything I could on Wikipedia (before they started taking it down). Necrons were my number 1 choice for the campaigns in Dark Crusade, many, many times. I just wasn't sure about the hobby/minature side of 40k, and never got into it. Then I played my first game as a proxy using my friend Seth's Khorne army as my necrons (oblits as heavy destroyers, Rhino as my monolith, etc) vs my other friend's Tau. It was a blast to play and I said the next day "I need more." Thanks go to Seth who egged me on to play that day for the first time. And thus began my spiral into the 40k hobby. I did some searching on the net and found the Necron Battle Force to be the best value and got it from a combic book store online that sold it for much cheaper than GW. I set up a production line to create my dudes and got enough up and running in the week I got the box to play 1000pts that weekend.


(Click for detail as usual)
As far as my lists go for battle, I've played them about 10 times so far, and never repeated the same list. I'm still learning what works and what doesn't. I've tried different combos of Destroyers, Heavies, and Wraiths. I tried a Warrior heavy list by cutting the Lith, but got cut down myself. Otherwise I've been able to hold my own with a [6W/3L/1D] record against Tau, Nids, and two different Chaos armies. And I only have what was in the box, so it's about 1500pts, 40 some odd Warriors, a Lord, Lith, 6 Destroyers that normally see action as Heavies, and around 15 bases of scarabs. As for painting them, the pictures follow below. I've left their arms off so I can paint the chest easily. So I have about 40 Warriors that look like the picture on the right, ready to go at a moment's notice.


They are primed black, painted once with Mithril Silver, then the chest is covered in Bleached Bone, Goblin Green in the rib cages and eyes, and Blazing Orange for the symbol, neck supports, and you can't see it, but the spine as well. I do a second coat of green to make it stand out more and then go once more with Bone to cover up any green that may have got onto the chest. I thought of making the legs Midnight Blue, but I like their current look more, so they may just stop there. The scarabs I'm particularly proud of. They are definitely something different looking with the contrasting orange and green and the blue legs. Destroyers are currently the same setup as the Warriors (you can peek at some in the army wide pictures above). I was also thinking of making their skimmer bodies blue, to be a big brother to the scarab look, but that may not happen. Finally, the Lord and Lith are unpainted as they will be done when I have better skills in painting as they will be center pieces and I don't want to mess them up.

So there you go, my first army exposé. Always feel bad when I have long posts, in case someone will comment "TL;DR". Either way, hope you enjoyed it and I'll update as I finish the army. Worst part of building a Necron force? Each warrior flayer is 5 parts to construct... times 40... plus the same for each Destroyer cannon times 6... ughhhhh! That's a lot of cleaning of mold flashings!

Wednesday, October 7, 2009

Camera test and small update


(Click for more detail)

So there we go, my first picture with my friend's dinky Kodak camera. It's probably almost a decade old, but still can put out some good pictures if I get the focus just right. The pic above was taken at night with no real lighting around the table at all. The table is my gaming board that I "re-purposed" from my fraternity, which would explain the letters in the center. There's a mix of my terrain and the Necromunda cardboard stuff from my friend's set. You can spot his black-primed Tau littering the board, since he just leaves them at my place between games for ease of use. We have nice terrain, actual copies of the rule books and codexes, official templates, but all are units are still mostly just from the sprue or only base coated black, lol. I'll post my WIP Necrons in a day or so as those are coming together nicely. My friend is working on painting his Tau red and yellow like Soviet Russia, but obviously they are at my place and are on hiatus now.

My pin drill and bits came in the other day so I now can bore out my bolters and Rhino exhaust pipes. I also ordered some magnets, so I will be able to start drilling out those holes as well. No more excuses indeed! I'm also contemplating making custom Baal Preds instead of buying from GW direct. That will be the source of another post. I now have a good 3-4 blog posts lined up, but will space them out to keep people coming back. ;-)

Oh, and I tried my hand at washes and flocking for the first time on my bunker. The results did add a bit of character. I washed the building with Devlan Mud and that took out some of the shine of the gray. I then added Badab Black to around each window to add some soot from weapons fire from the inside. And then I did Thrakka green around the bottom mixed with some mossy flock along the bottom edges. Let me know what you think!

Friday, October 2, 2009

No more excuses

I have a workstation in my home to work on my models, like any good hobbyist, but I keep sitting down and making excuses why I can't finish a model or why I don't want to start a project. Usually I want to take pictures of my work, but no camera. Or I want to magnatize my Rhinos, so I can't do to much until those are put in. Or I don't have the right paints to paint my marines. Well no more! I'm borrowing a camera from a friend to document my projects and then I sat down at the miniwargaming website and started loading up on modeling supplies. I got over 200 magnets, 200g of Green Stuff, a razor saw for large builds and scaring Rhinos and terrain, the foundation paint set, a fan brush for painting my Rhinos, a Predator box set since I still need Baal Preds in my list, and the 40k counter set to make games go just a bit faster not having to remember what unit did what last turn.

The nice thing was this was during miniwargaming's 2-year anniversary sale, so much of this was at 20% off, a bulk deal, or free. The green stuff was 20 bucks for 2 tubes compared to 14 bucks for one. 40 of the magnets and the fan brush were free deals as part of the sale. Plus they give you points for everything you buy that turn into dollars off your next purchase plus when you buy anything they give you a 5 dollar off coupon. I split the order into two so I immediately used up the points I earned and coupon from the first order to knock another 10 bucks off my second order.

So, no more complaining and putting things off. Once everything comes in I'll start finishing up some stuff that can show results on the table. I'll also document the steps of my builds as I'm trying to mod up my Rhinos a bit more than usual to add some uniqueness. Also in the works will be my chapter background, organization, and an army list. Some of that won't be interesting for most, but the blog is not just about letting people know about what I'm up to, but as a record of my own thoughts and a sounding board for my ideas.

To steal an idea from Bell of Lost Souls blog, I'll try to pose a question at the end of my entries on the topic I wrote about.

» What holds you back from a project? Too daunting, too many ideas, or just not enough reasons to complete it? For those that blog, do you feel you need to produce content for your blog to keep readers interested, or is it more of a personal record and you're not concerned with page hits?

Monday, September 21, 2009

Adding paint to the palette

When I picked up my models and started painting I just got the Citadel starter kit of colors with all the extras and that's all I've had to work with for a while now. I slowly bought a color two like Bleached Bone and Codex Gray, but that still wasn't cutting it. So I checked out Ebay (which is were I get all my models, bits, etc) and found a lot that had about 13 paints, the whole citadel wash series, and a bottle of the citadel super glue. I placed my maximum bid on the last day of the bid, went out and did my own thing thinking I'd be out bid, since I wouldn't be home to try wrestle for it if it went over my max. But low and behold I actually won and got it in the mail the other day. So now I'm set to paint just about whatever I need. Plus I have two of some important ones like black, white, and red (for my Blood Angels, haha). Now all I need are the foundation paints for making super nice looking models, but that can wait.

I'll try to do some washing on my current models or terrain pieces to add some character and I'll post pictures as soon as I can.